
Using Adobe Illustrator on MacOS to Print Posters
This page assumes you have logged into one of the G.R.I.D. lab computers that are running macOS and have opened your poster in the Adobe Illustrator CC program. There are separate instructions for poster printing from Adobe Illustrator on Windows.
This page will show you how to set the color matching, page size, orientation, scaling, and other essential printer options and then print the poster from Illustrator.
On each screenshot, the only items that you must check or modify are outlined in red. All other items were left at default values during our testing. You are "on your own" if you change anything else.
The basic workflow is to open the File->Print menu, select the desired poster printer, select "application managed" color matching in the operating system print driver, set the custom page size, verify the orientation and scaling, select the color matching ICC profile in Illustrator, and then send your print job to the printer.
After printing, you must use the appropriate G.R.I.D. printer release form to release your print from the print queue so it can actually print.
Start by selecting the Print item from the File menu in Illustrator. This will bring up the Illustrator Print dialog box as shown in the screenshot below. The items outlined in red must be checked or changed in the order shown, as described in detail below.

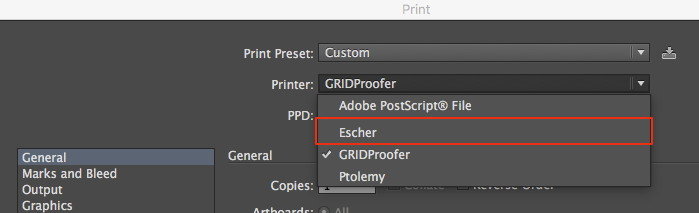
1) Set the desired printer
GRIDProofer is always the default printer in this lab. That's because it is a simple and cheap laser printer. From the drop-down menu at the top of the Print dialog box, change this to either Escher or Ptolemy, as shown in this screenshot selection.
2) Set color matching option in the operating system print driver
You will get awful colors unless you set a consistent color matching option in the operating system print driver (this step) and in Adobe Illustrator color management (step 8, below).
Without forcing the settings to match, first Illustrator will adjust the colors as it thinks would print best, and then the operating system will adjust them again - differently. Most settings in the Illustrator Print dialog box override the equivalent settings in the operating system print driver, but this is not true for the color matching options! You must force them to be the same. By default, they may very well be different.
You have two options for color management:
- Let the application (Illustrator) manage the colors. With this option, you tell Illustrator where to find the correct color profile for the printer. Then, using its knowledge of the original color space for each element that was created or imported into the poster, plus the profile for how the printer colors actually look on paper, Illustrator will adjust the color values of the pixels to match on the print as closely as possible with how they look on the screen. Illustrator will send these pixels to the printer with instructions to print them "as is" with no further changes. We recommend this option and it is described in these instructions.
Calibration with a spectrophotometer can be used to create a profile of how specific combinations of printer inks and paper actually represent colors. The Escher and Ptolemy printers each have a built-in spectrophotometer. We have used it to create International Color Consortium (ICC) color profiles for each printer on the standard paper that we use in the lab. Selecting the correct profile allows Illustrator to more accurately represent the colors in your poster when printing. - Let the printer manage the colors. With this option, the printer takes the colors in your document that it receives and adjusts them according to a generic, less accurate, profile for that model printer. If the application does not include the original color profile that describes the print, this conversion will be even less accurate. We do not recommend this option and do not describe how to set it. If you wish to use color matching in the printer, you still must force the same setting in both the print driver and Illustrator, so you still have to complete both steps 2 and 8 of these instructions.
Color matching in the print driver should be set first before setting print sizes, etc., in the Illustrator Print dialog box because opening the print driver may reset those other values.
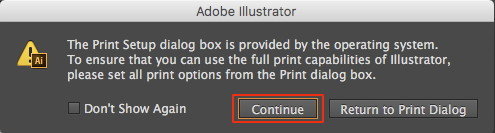
Start by clicking the Setup... button on the bottom left of the Illustrator Print dialog box. Do not click the Page Setup... button - that does not have the options you need.
You will see a warning message from Illustrator that you should not use the operating system print setup. However, experimentation has shown that color matching is one situation where you must make the same setting in both the operating system print setup and in Illustrator's own Print dialog box. Click the Continue button, as shown in this screenshot selection.
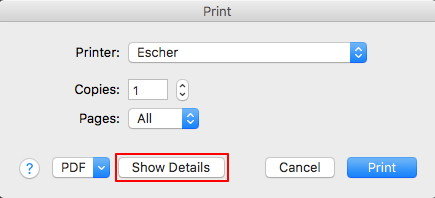
This will bring up the macOS normal print driver dialog box. Depending on whether you have used this computer before, it may appear as a simple box with virtually no options. If so, click on the Show Details button, as shown in this screenshot selection.
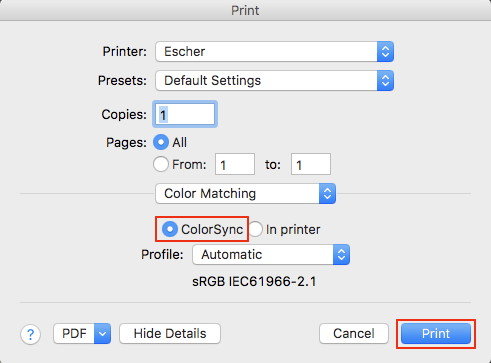
The full macOS Print dialog box initially displays the Layout options. Click on the drop-down menu in the center to switch to the Color Matching options, as shown in this screenshot selection

Make sure that the Colorsync option is selected with the Automatic Profile setting. Then click on the Print button, as shown in this screenshot selection. This does not send the print - it only closes the print driver dialog box and returns you to the Illustrator Print dialog box.
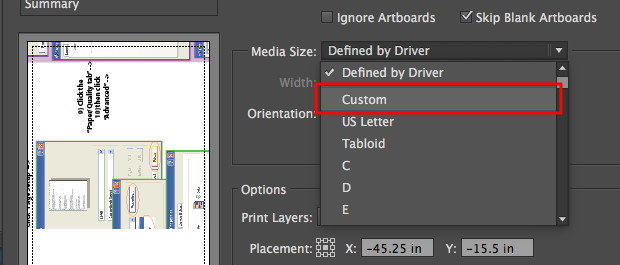
3) Select the option for a custom page size
The default page size is always 8.5 by 11 inches. You can see that page size listed at the bottom of the preview image. You must set a custom page size large enough to fit your poster! Select the Custom item from the Media Size drop-down menu in the middle of the window, as shown in this screenshot selection.
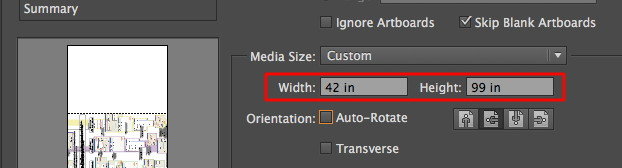
4) Set actual page size
Once the Custom item has been selected, you can enter the width and height values for your print in the data entry boxes right below the Media Size drop-down menu.
The "width" value is the length along the cut edge of the printer roll and cannot exceed 42 inches. The "height" value is the length along the roll feed dimension and can be any length (up to 1200 inches maximum per new roll of paper!).
This may not match your intuition! You may think of the long dimension of your landscape poster as the "width". But if it is longer than 42 inches, you must treat it as the "height" and then let Illustrator rotate your print.
You can enter your desired values in inches, centimeters, or printer points (72 per inch), using the abbreviations "in", "cm", or "pt".
Here is a screenshot selection showing a width value of 42 inches and a height value of 99 inches.
5) Set print orientation
Click the Orientation: Auto-Rotate button and let Illustrator automatically rotate your print file to fit the page size definition as needed, as shown in this screenshot selection. If the Auto-Rotate button is grayed-out and cannot be checked, click on one of the small orientation icons to the right as needed to rotate your picture to fit the preview frame on the left.
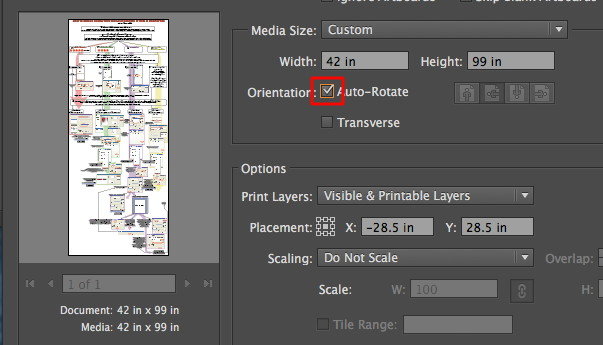
In the screenshot above, you can see the correct page size below the print preview on the left, and the poster is correctly oriented within that preview.
6) Set scaling option, if desired
Illustrator can scale your print as needed to fit the page size you have defined. The normal option is to print without any scaling. The Scaling drop-down menu near the bottom center of the Print dialog box gives you other options, as shown in this screenshot selection. The most useful option is Fit to Page, which will enlarge or reduce your image to just fit within the page size you have defined.
Warning: if your poster was made to a size that is significantly smaller than the paper size you have defined, "scaling up" the print may create significant "pixelation" that will look bad. In that case, remake the poster to the correct final paper size.

7) Check the preview size and orientation
At this point, you should have the paper size, print orientation, and scaling correctly set for your print. Check the preview image once more to make sure that your print is fitting the paper size correctly.
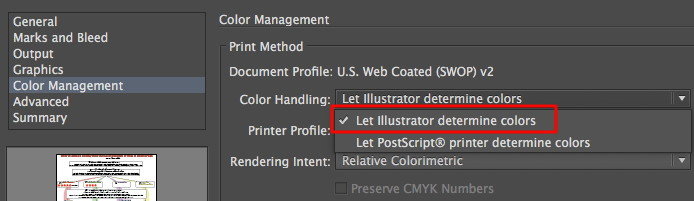
8) Force Illustrator color matching to be the same as the print driver and select ICC profile
You must tell Illustrator to use the same color matching settings (application or printer) as you selected in step 2 in the operating system print driver. Otherwise, you will get badly distorted colors as Illustrator and the operating system each do something different to adjust the colors. As explained in step 2, these instructions recommend that you let Illustrator handle the color matching using a custom ICC color profile created specifically for each printer in the lab. That is described below.
First, you click on the Color Management tab in the center left of the Print dialog box, which will display a set of Color Management options, as shown in this screenshot selection.
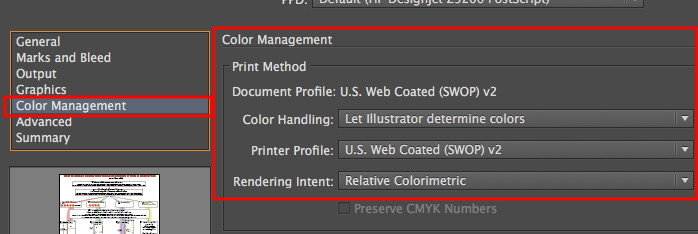
In the Color Management section, make sure that the Let Illustrator determine colors item is selected from the Color Handling drop-down menu, as shown in this screenshot selection.
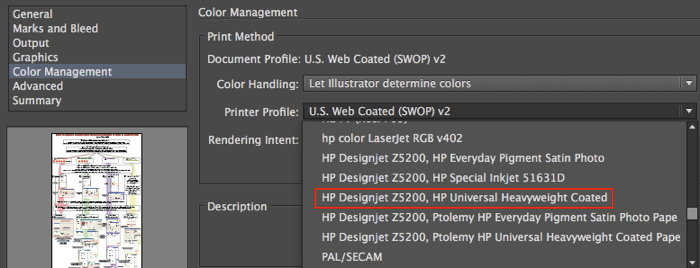
Now use the Printer Profile drop-down menu to find and select the profile named "HP Designjet Z5200, Ptolemy HP Universal Heavyweight Coated" for the Ptolemy printer or "HP DesignJet Z6, HP Universal Heavyweight Coated Paper, Best" for the Escher2 printer.
9) Send your print job
Pressing the Print button in the lower right of the Print dialog box sends the print job to the printer.